28 Nov 2011

Windows 7 Full Backup OR Create Operating System Image on HD/USB


Windows 7 is the best because it provides very useful features like system recovery, complete PC scan, automatic system repair, andsystem backup support. 

The backup features is really very useful, because in case your windows corrupt any file, then you can easily restore your windows tooriginal condition. 
Although there are a lot of third party software's available for creating system image for windows 7, but third party softwares are not reliable. 

It may contains virus, trojan or it can crash your operating system. The only safe way to create image of your windows 7 is to use the built in feature of windows 7.

Image is a backup copy that stores in your hard drive, and in case of any problem you can always revert your system to that position. The problems occurs when there is any problem or issues with your windows. You can read my previous post about windows 7 issues.

Now back to the topic, and that is how we can create a image of the hard disk to restore the data inside your computer. Well this method is very simple and you canstart from inside the windows 7.

How to Create Image for Windows 7

1. Click on “Start” button, and then type “Backup” in search menu. In the next box you will see “Backup and Restore” option. OR you can also access from Control Panel > Backup and Restore.

2. After launching Backup and Restore, click on “Create a system image” option located at the right side panel. Now you have the option to backup your data inside your hard disk, USB, DVD, CD or any other hard disk. Select any option and confirm the space for the backup. Click on “Start Backup” for confirmation.

How to Restore From Created Image

1. In case there is minor problem and your windows 7 can start then you can easily backup your system from inside the windows. Go to “Control Panel” and click on “Recovery” and then “Advance Recovery Method” , then select the first option which says “Use a system image your created earlier”. That’s all, restart your computer and every thing is fine now.

2. But if your windows is not starting up or there is serious problem then Turn ON your system and press F8 to access “Recover your Computer” option. Select keyboard layout and enter your password and username if you have. Finally you will see “System Image Recovery” option. click on it and follow all the instructions.

Know the model of your computer

Go to Run Type 'dxdiag' without quote


you can see model/Specification of your computer


27 Nov 2011

Desktop Icon Toy


What cool things could you do with Desktop Icon Toy?

  • Arrange Desktop Icons
    • Do you want to dazzle your co-workers with flying icons that magically fly
      into amazing formations like polygons and hearts?
    • How about an amusing way to remind your family of the time with
      an amazing figure of a fully functional analog clock?
With this cool simple tool you can even organize and arrange all your desktop icons into simple rows to the right, along the top or place them anywhere your mind chooses?

All these things could be easily done with Desktop Icon Toy.

You can arrange your desktop icons into many complex figures and shapes, like a:
  • Clock (all the icons will be aligned as a analog clock, showing the exact time).
  • 4-pointed, 5-pointed, or 6-pointed Stars, a Cross, and all kinds of Hearts.
  • Horizontal or Vertical Ellipse, Spiral, and Circle.
  • Triangle, Rhombus, Pentagon, Hexagon, and many many Shapes.
  • Align desktop icons to the left, right, top or bottom.
  • Neaty Around all the Edges.

Of course, not only that, you could also:
  • Arrange icons precisely with:
    • "CTRL" + "Arrow Key", which moves an individual icon in that direction by one pixel.
    • "ALT" + "Arrow Key", which moves an individual icon in that direction by ten pixels.
  • Customize the layout by changing the order of the icons such as placing "My Computer" as the last one, sorting icons by name, or changing the start position of the first icon.
  • Save Desktop Icon Position
Would you always work on different screen resolutions? Is your desktop icon's layout always messed up? Desktop Icon Toy can save desktop icon layout for different screen resolutions, and it will automatically repostion and restore the proper layout when the screen2 resolution has been changed. You can also save multiple layouts by different layout names.
  • Mouse Gesture
Desktop Icon Toy also supports Mouse Gesture. You can simply hold down the left mouse button in the empty area of desktop, and then move mouse to right (left, top or bottom) and release it. All icons will be arranged to right (left, top or bottom). More features can be configured in option panel.
  • Animate Desktop Icons
With Desktop Icon Toy, you could make cool effects.
  • Hover your mouse cursor over an icon to make it dance.
  • Drag the icons at different speeds and drop them at another location and they will:
    • Race around the desktop at blinding speed or a snails pace.
  • Remove Desktop Icon Texts
Usually, you could easily identify different programs by their icons and positions on desktop. However, (as I suspect you do) you may have many icons cluttering your desktop, and as you can see, it has become very slow to refresh the desktop. Now, you could remove the classic ugly text below the desktop icons, and replace it with a cool customized pop-up tooltip which contains the full text. NOT, just the limited text that normally appears. Miraculously, this will significantly improve the performance when refreshing your desktop, and your desktop will finally become very neat and tidy; more like a window on the world that you expected.
  • Show/Hide Desktop Icons or Desktop Icon Texts on Demand
    • Have you chosen a favorite picture as your wallpaper?
    • Do you have a little regret as desktop icons covered up your wallpaper?
    • Do you wish to show/hide your desktop icons or desktop icon texts on demand?
With Desktop Icon Toyyour desktop icons or desktop icon texts could be always hidden, and would only be shown when you really need them. (Such as click desktop, mouse over desktop or over desktop icons.) Now, you will always enjoy your beautiful wallpaper.
  • Lock Desktop Icons
Besides saving and restoring the layout your icons, Desktop Icon Toy allows you to also lock the desktop icons. (Don't worry about carelessly moving your icons again.)
  • Swap Desktop Icons in Primary Monitor
    • Do you have multiple monitors?
    • Do you frequently switch between single monitor and multiple monitors?
    • Have you frustrated by frequently arranging the icons druing switch of monitors?
With Desktop Icon Toy, you can always keep icons in the layout of multiple monitors. If you switch in single monitor mode, you still could swap secondary monitor icons in primary monitor, which allow you to access them temporarily. 
  • Change Desktop Icon Size
If you are tired of the small desktop icons, now you can
  • Resize them and make them bigger, like:
    • 48x48
    • 64x64
    • 128x128
  • Revise Tooltips
Would you to change what the tooltips on your desktop say? With Desktop Icon Toy, you change the wording of the tooltip for any icons. It will be displayed when you hover the mouse over the icon. You can also embed HTML tags into the tooltip to enrich its appearance.
  • Change Desktop Icon Text Color
Sometimes you change to use a beautiful wallpaper, but maybe hard to see your desktop icon text again as its default color is similar to your wallpaper. Even more there will be an ugly background under the test. With Desktop Icon Toy, you can change the desktop icon text or background to any color. You can also make the background of desktop icon text transparent.
  • More Features
  • Remove all desktop icons, and only keep the icon texts.
  • Change desktop icons to small mode,
    (all the icons will become small, and icon texts will be placed on the right of icons.)
  • Remove desktop icon shortcut overlay.
  • Activate desktop icons using single mouse click.
  • Automatically select icon when mouse hovers over an icon.

Windows 7 Log On Background Changer


Windows 7 Logon Background Changer is a free open source software that let you change the wallpaper of the Windows 7 logon screen (also known as "welcome screen", "login screen" or LogonUI).


It has been tested successfully with the final version of Windows 7 (RTM) and Windows 7 RC 7100. It works with Windows 7 Home Basic, Home Premium, Professional, Ultimate and Enterprise, in x86 or x64 (32 or 64 bits). It does NOT work with Windows 7 Starter (edition sold with most netbooks). It works also on Windows Server 2008 R2 (but you are not supposed to customize a server).
On a side note, this small program is WPF based, it's a nice technical demo of Windows Presentation Foundation capabilities for those interested in WPF. It requires a decent GPU for the 3D animations to run smoothly. It runs fine with my Radeon HD 3200 on my laptop computer, but it should also work with lower end graphic cards, albeit slowly.
What does it do?
  • It does NOT change any system file, and the program itself does not requires admin rights to run : it will just ask you to run as admin a very simple cmd file that creates the required folder and registry key with the appropriate rights. Any user of the computer will then be able to change the Windows 7 logon screen wallpaper. You can also prevent users from being able to change the logon screen wallpaper if you don't want them to be able to modify it without administrator rights (option available by clicking on the "Settings" button).
  • It creates a few JPEG files based on the image you want to put as wallpaper for the Windows 7 login screen, applies the appropriate cropping and sizing and saves them using the best compression quality possible.
Change log:

Fixes the following bug
-When running the application as administrator, if the "background" folder is not created, the application can't apply the wallpaper and will ask to run "enable background change.cmd".
Adds a feature:
-Allows the user to prevent other users from changing the logon background wallpaper.


Download here- Windows 7 Log On Background Changer


Install & Check It by Pressing Win+L

Website coppier

Screenshot of Windows GUI


HTTrack is a free  and easy-to-use offline browser utility.It allows you to download a World Wide Web site from the Internet to a local directory, building recursively all directories, getting HTML, images, and other files from the server to your computer. HTTrack arranges the original site's relative link-structure. Simply open a page of the "mirrored" website in your browser, and you can browse the site from link to link, as if you were viewing it online. HTTrack can also update an existing mirrored site, and resume interrupted downloads. HTTrack is fully configurable, and has an integrated help system.


WinHTTrack is the Windows 2000/XP/Vista/Seven release of HTTrack, and WebHTTrack the Linux/Unix/BSD release. See the download page


  • Download entire Website Using This software
  • Then You can use the website When you are in offline
  • Download this Software here Httrack website coppier

Mini mail

Mail from Mini mail using either Gmail Id or Yahoo Id
Two Mail in  Single Application
Mail a Text directly from this mini mail, 
No need to open Gmail.com or Yahoomail.com
Auto Save Contact,
Download Mini mail from Here

Note:
Steps:
  1. Download Mini mail.rar
  2. Extarct it
  3. Install Setup
  4. Cut and Paste 'SEND MAILL' Folder in 'D:\ ' (D:\SEND MAILL). It is Database File
  5. Do not Rename or Alter SEND MAILL Folder, If you alter you cant add Contacts
Screen Shot


You can Add Contacts:


Created by me
My Name Balakumar.V
Comment Your Suggestions, If you like

G-mail as External Drive (up-to 7 GB)


Use your Gmail as an external drive (7GB)
This is shows you how to use your Gmail account as an extra drive with 7.18 GB of extra space.
You do need to be connected to the internet to access it.

This preety much uses your gmail space as an online drive.

Step 2Follow through the setup

Follow through the setup

Click on the Setup icon. Then click on run. And follow through the steps and enter your Gmail Email and Password. The when you're done you should see another drive in My Computer called GMail Drive
.

Step 3Enjoy your free 7.18GB !

Enjoy your free 7.18GB !

Just log-in with your usual Gmail Email and Password.

26 Nov 2011

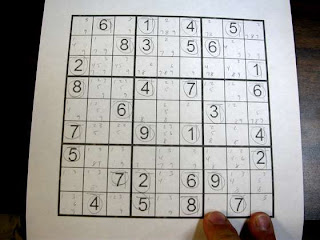
Solve Sudoku (Without even thinking!)


This instructable provides step by step instructions to complete a Sudoku puzzle by simple process of elimination.

One of the things I that drove me crazy about Sudoku is how difficult it is to return to a puzzle if you get interupted. This system allows you to walk away from a puzzle at any time and return exactly where you left off.

Step 1What you need to begin
You need: 

1. A sudoku puzzle. I enlarged this one (which was the puzzle that appeared on Sudoku.com on July 8, 2006.) to make photography easier. I find this system works better on larger puzzles.

2. A pencil, Not a pen. A pencil.

3. An eraser

Step 2Fill in the "Missing Grid"

You see, a Sudoku puzzle is missing a grid. Once you put in this grid, it is sooo much easier. 


Enter the numbers 1 through 9 in a "tic-tac-toe" pattern in every blank box. 


Step 3Erase "Across"

For each number that is preprinted in the puzzle, you will start erasing that number from the appropriate grids you just wrote in.

So the first number (in the upper right corner) is a "6". Erase every other "6" in that row. Once you have completed the erasing, draw a line across the top of the number to indicate that you have cleared out that line
.

Step 4Erase Down

Now, for that same number "6", erase the corresponding "6"'s in every box in the same column. Once you have completed erasing, draw a line down the edge of the number to indicate that you have completed this step

.

Step 5Erase "All Around"


Ok, last step for the first number "6" Erase all the "6"s in the same quadrant. Then draw a circle around the number to indicate you have completed this step.

Now you have eliminated all the sixes from all the other blocks. That indicates that a Six canot appear in any of those blocks.

Keep going, repeat those same three steps for all the other pre-printed numbers in the puzzle


Step 6Repeat for all the pre-printed numbers

Just repeat thos three steps for each number that was printed in the puzzle. The purpose of the down, across, and circle marks on each number is to provide for any interruption that may occur when solving the puzzle. By drawling those lines you can always tell exactly where you left off. If the number has all three marks, you can be sure that all of the corresponding numbers have been eliminated from the puzzle. YOu can effectively forget about that block now.

Let's see what the result of all that erasing was. 

Step 7Locate Answers


By process of elimination you will have done so much erasing in some blocks that only one number is left. Guess what. THat is the answer for that block. Congratulate yourself.

Write that number large in the block, then treat it like a preprinted number. Eliminate all the across, down and around numbers as you have already done so many times before.

In this image, the red pen points point to all the answers that were provided just by doing the initial erasing.

We have not yet begun to think!

Step 8Other kinds of eliminations.


You won't always be so lucky. Not every time will you end up erasing all the numbers but one in a block. If that is the case, then you peruse the puzzle to find eliminations.

First look down each column. If you find a number that only appears in one block in a column. That is the answer for that block.

In this picture, the pen point points to a three. That is the only three in that column, so that must be where it goes.

Write it large, then treat it like a pre-printed number. See ... this isn't thinking. This is EASY

Step 9Look Around a quadrant.


I know, they aren't really quadrants, but you know what I mean, don't you?

If you've looked across the columns, and across the rows and there are all duplicates, then look in the group. If there is one number in the group that only appears in one block, then it's your answer.

See... There is no guessing in Sudoku. One of these situations has to occur. You just need to find them.

IN this picture the 5 only appears in one block in the group. It goes there.

Write it big, then treat it like a pre-printed number.

See where we're going, here?

Step 10Lather, rinse repeat.

Eventually, you will find all those lonely numbers in thier rows, columns or groups.

Remember to draw those lines and circles in case you get interrupted.

Eventually you will solve the puzzle.

Compare our solution to the "Official Solution" found on the Sudoku.com site. See? A perfect match.

And you thought Sudoku was hard.

It's so easy, you don't even have to think!

Sudoku 4 Beginer


I will be showing the most basic to not so basic methods,trick and tips to finish a sudoku.this instructable is for anyone who plays or wants to play sudoku even if you don't know how to play.

I'll start with the basic thing and progress to the less basic things.

Step 1How to play sudoku


The objective is to fill a 9x9 grid so that each column, each row, and each of the nine 3x3 boxes (also called blocks or regions) contains the digits from 1 to 9.

A cell is the smallest block in the game. A row , column and region consists of 9 cells and the whole game consists of 81 cells. A region has thicker lines surrounding it. This simply makes it easier to play the game
.

Step 2The basic basics(scanning)


I most basic strategy to find missing numbers is scanning and it consists of
1)Cross-hatching.
2)Counting.

1) Crosshatching (shown in the first picture). You scan rows and columns to eliminate where a specific number can be in a given region.As you can see there is only one legal place left for the 1(marked green).

2)Counting. In counting you simply count all the different numbers that's in a row,column and region that connects to one cell. if there is just one number missing then thats what should be in the cell. Take a look at the second picture and see if you can figure out the missing number in the green cell.

the correct answer is :4

legend: green = result
red = cause(the cause of the result that is
)

Step 3The analysis is a higher level method


Analysis consists of two methods namely candidate elimination and the what if. 

I will not be showing the what if to you because i don't like it. It's slow progress and i don't like to erase that much. 

the candidate elimination. the method for candidate elimination I'm showing now is the matched pair method.This method happens when a pair of numbers are the only possible answer to two cells. 

Take a look at the picture. I have concluded(with the help of cross hatching) that 7 and 8 can only be in two places in the lower left region(i filled both in) . The two cells which 7 and 8 can be in is in the same column, thus it cannot be elsewhere in the column. There is two other blank cells in this column and the missing numbers is 9 and 3. We can see that 3 can not be in the 'middle' open cell. This means 3 is in the top cell(marked green) and 9 is in the 'middle' cell. 

Candidate elimination can also be used with three number in three cells. 

*note: Candidate elimination is note the fastest nor easiest method for for finding the green cells answer. That is why one must first scan before analyzing . I will try to find a better example
.

Step 4Analysis (almost , I think)


this one is almost like the candidate elimination i showed you in the previous step(its called deriving certainty from uncertainty).

Take a look at the picture below.In the center region. There is only two possible places for the 7(and 2). There is three places for the seven in the middle right region , but can not be in the middle ones because 7 is reserved by the center region thus there is only one place let for the seven in the middle right region
.

Step 5Xy-wing(This is an advanced technique )


he xy wing is the most difficult technique i have tried because its more difficult to spot it(and to teach :-)

You'll understand better if you check the pics. It works by removing candidates.

the values in the blue squares will be assigned an x,y,z according to the numbers. In this instructable x=8 ; z=2 ; y=9 The green square with the redlining around it is a buddy(in the same row,column or region) of the blue block with 8,9 and the blue block 8,2. and the 9,2 blue block is an buddy of the 8,9 and 8,2 blue blocks. This means that 8(which is also in the two blue buddy blocks). cannot be in the red lined block. If your not sure why check the next picture.
 

Step 6Software

i have used a few programs to play sudoku with and only one has made it mark. It's called simple sudoku. The things i like about it is the hints and the show candidates feature. The hint tells you the method to use not the number. And the show candidates feature show all the possible answer for each block and you can remove any candidate from a cell.

*note the method for filling in the possible answers is exactly the same as step 1.It is just repeated for each square and written in.

Step 7Lastly(just a small thanks)

Thanks for reading my instructable, If you have any questions or know bout any technique i haven't included please add a comment. I believe I didn't copy anything directly from a site and i you spot that i have then i will rectify the problem. I used wikipedia,simple sudoku and brainbashers for information.

23 Nov 2011

Removing blemishes


blemishesmain REMOVE BLEMISHES IN PHOTOSHOP
bomb funk REMOVE BLEMISHES IN PHOTOSHOP In this tutorial we are going to use The Spot Healing Brush to removing blemishes. We can greatly improve a portrait by removing skin imperfections which are rarely a desirable feature in a photograph.
In previous versions of Photoshop, you could use the Clone Stamp tool or the Patch tool for this task. Photoshop CS introduced the Healing Brush, which is even better for repairing certain skin imperfections. The Spot Healing Brush can be found in the fourth row on the toolbar, and looks like a plaster. The Spot Healing Brush is now the simplest tool to use for removing blemishes. The key to using the Spot Healing Brush is to choose a brush size that is just slightly larger than the blemish and to work in stages on separate layers.
Roll Over Image
retouch01 REMOVE BLEMISHES IN PHOTOSHOP

blemishes01 REMOVE BLEMISHES IN PHOTOSHOP
1 REMOVE BLEMISHES IN PHOTOSHOP With the image open, drag the Background layer over the New Layer icon to duplicate it.
green REMOVE BLEMISHES IN PHOTOSHOP A Background copy layer is added, but the screen does not change.
2 REMOVE BLEMISHES IN PHOTOSHOP Click the Zoom tool.
3 REMOVE BLEMISHES IN PHOTOSHOP Click Resize Windows To Fit.
4 REMOVE BLEMISHES IN PHOTOSHOP Click and drag over the blemish areas to zoom in.
green REMOVE BLEMISHES IN PHOTOSHOP The image is enlarged and fills the screen.
5 REMOVE BLEMISHES IN PHOTOSHOP Click the New Layer icon to add a new blank layer.
orange REMOVE BLEMISHES IN PHOTOSHOP A new layer is added in the Layers palette, but the screen does not change.
6 REMOVE BLEMISHES IN PHOTOSHOP Click the Spot Healing Brush.
7 REMOVE BLEMISHES IN PHOTOSHOP Click Sample All Layers.
8 REMOVE BLEMISHES IN PHOTOSHOP Click here to open the Brush Picker.
blemishes2 REMOVE BLEMISHES IN PHOTOSHOP
9 REMOVE BLEMISHES IN PHOTOSHOP Click and drag the Diameter slider to adjust the brush size.
green REMOVE BLEMISHES IN PHOTOSHOP Note: The brush size should be just larger than the blemish that you want to remove.
10 REMOVE BLEMISHES IN PHOTOSHOP Click each of the worst blemishes of a similar size first.
green REMOVE BLEMISHES IN PHOTOSHOP Photoshop removes the blemishes and blends the surrounding skin area.
11 REMOVE BLEMISHES IN PHOTOSHOP Click the New Layer icon to add another blank layer.
12 REMOVE BLEMISHES IN PHOTOSHOP Repeat steps 8 to 10, clicking the other blemishes.
orange REMOVE BLEMISHES IN PHOTOSHOP Layer 2 should be highlighted in the Layers palette.
13 REMOVE BLEMISHES IN PHOTOSHOP Click here and drag the Opacity slider for Layer 2 to the left until the skin looks natural.
blemishes3 REMOVE BLEMISHES IN PHOTOSHOP
14 REMOVE BLEMISHES IN PHOTOSHOP Press the ALT key and click the New Layer icon.
green REMOVE BLEMISHES IN PHOTOSHOP The New Layer dialog box appears.
15 REMOVE BLEMISHES IN PHOTOSHOP Type a name such as Skin Tone in the Name field.
16 REMOVE BLEMISHES IN PHOTOSHOP Click here and select Overlay for the mode.
17 REMOVE BLEMISHES IN PHOTOSHOP Click Fill with Overlay-Neutral Color (50% Gray).
18 REMOVE BLEMISHES IN PHOTOSHOP Click OK.
green REMOVE BLEMISHES IN PHOTOSHOP gray layer in Overlay mode appears in the Layers palette.
19 REMOVE BLEMISHES IN PHOTOSHOP Click the Brush tool.
20 REMOVE BLEMISHES IN PHOTOSHOP Click here and select a small soft-edged brush.
21 REMOVE BLEMISHES IN PHOTOSHOP Click here and reduce the brush opacity to about 5%.
22 REMOVE BLEMISHES IN PHOTOSHOP Click here to reset the default colors to black and white.
blemishes041 REMOVE BLEMISHES IN PHOTOSHOP
23 REMOVE BLEMISHES IN PHOTOSHOP Click here to reverse the colors, making white the foreground color.
24 REMOVE BLEMISHES IN PHOTOSHOP Paint over any dark spots in the image to smooth the skin.
green REMOVE BLEMISHES IN PHOTOSHOP The skin tone appears smoother. Continue painting over any dark areas, adjusting the size of the brush tool as necessary.
25 REMOVE BLEMISHES IN PHOTOSHOP Click here and drag the Layer Opacity slider to the left to reduce the effect for a more natural look.
26 REMOVE BLEMISHES IN PHOTOSHOP Click the Visibility icon for the gray layer off and on to compare the image before and after the adjustment.
green REMOVE BLEMISHES IN PHOTOSHOP The skin tone is smoothed and appears natural rather than over-corrected.
blemishes05 REMOVE BLEMISHES IN PHOTOSHOP
27 REMOVE BLEMISHES IN PHOTOSHOP Select all the layers except the original layer by holding down The Shift Key and clicking on all the layers, than go to Layers Merge Visibles or hit CTRL-E.
28 REMOVE BLEMISHES IN PHOTOSHOP Now click and drag the Merged layers to the Create New Layer button to make a copy of the layer.
29 REMOVE BLEMISHES IN PHOTOSHOP Select the copied layer and go to Filter-Blur-Gaussian Blur enter 1 pixel for the radius.
30 REMOVE BLEMISHES IN PHOTOSHOP Click OK.
blemishes06 REMOVE BLEMISHES IN PHOTOSHOP
31 REMOVE BLEMISHES IN PHOTOSHOP Select the Eraser Tool.
32 REMOVE BLEMISHES IN PHOTOSHOP In the brush option select a soft edge brush.
33 REMOVE BLEMISHES IN PHOTOSHOP Start erasing the important areas of the images so the viewer’s attention is drawn to the spots.
34 REMOVE BLEMISHES IN PHOTOSHOP Lower the opacity to 30% now the image looks more natural.
35 REMOVE BLEMISHES IN PHOTOSHOP Click the Levels Button.
36 REMOVE BLEMISHES IN PHOTOSHOP Play with the settings until you get the desired result.
retouch01 REMOVE BLEMISHES IN PHOTOSHOP
bomb funk REMOVE BLEMISHES IN PHOTOSHOP That’s it guys for this tutorial try experimenting with the settings and see what works best with your images.
Please leave your comments for anything related to this tutorial.

Twitter Delicious Facebook Digg Stumbleupon Favorites More

 
Design by Free WordPress Themes | Bloggerized by Lasantha - Premium Blogger Themes | Facebook Themes
/*Killer-Sudoku*/