


 8:02 am
 Balakumar

In this detailed tutorial I’ll be walking you through the process of create a clean style portfolio layout. Don’t forget the FREE PSD file is available to download at the bottom of the page. Lets get started…
What We’ll Be Creating
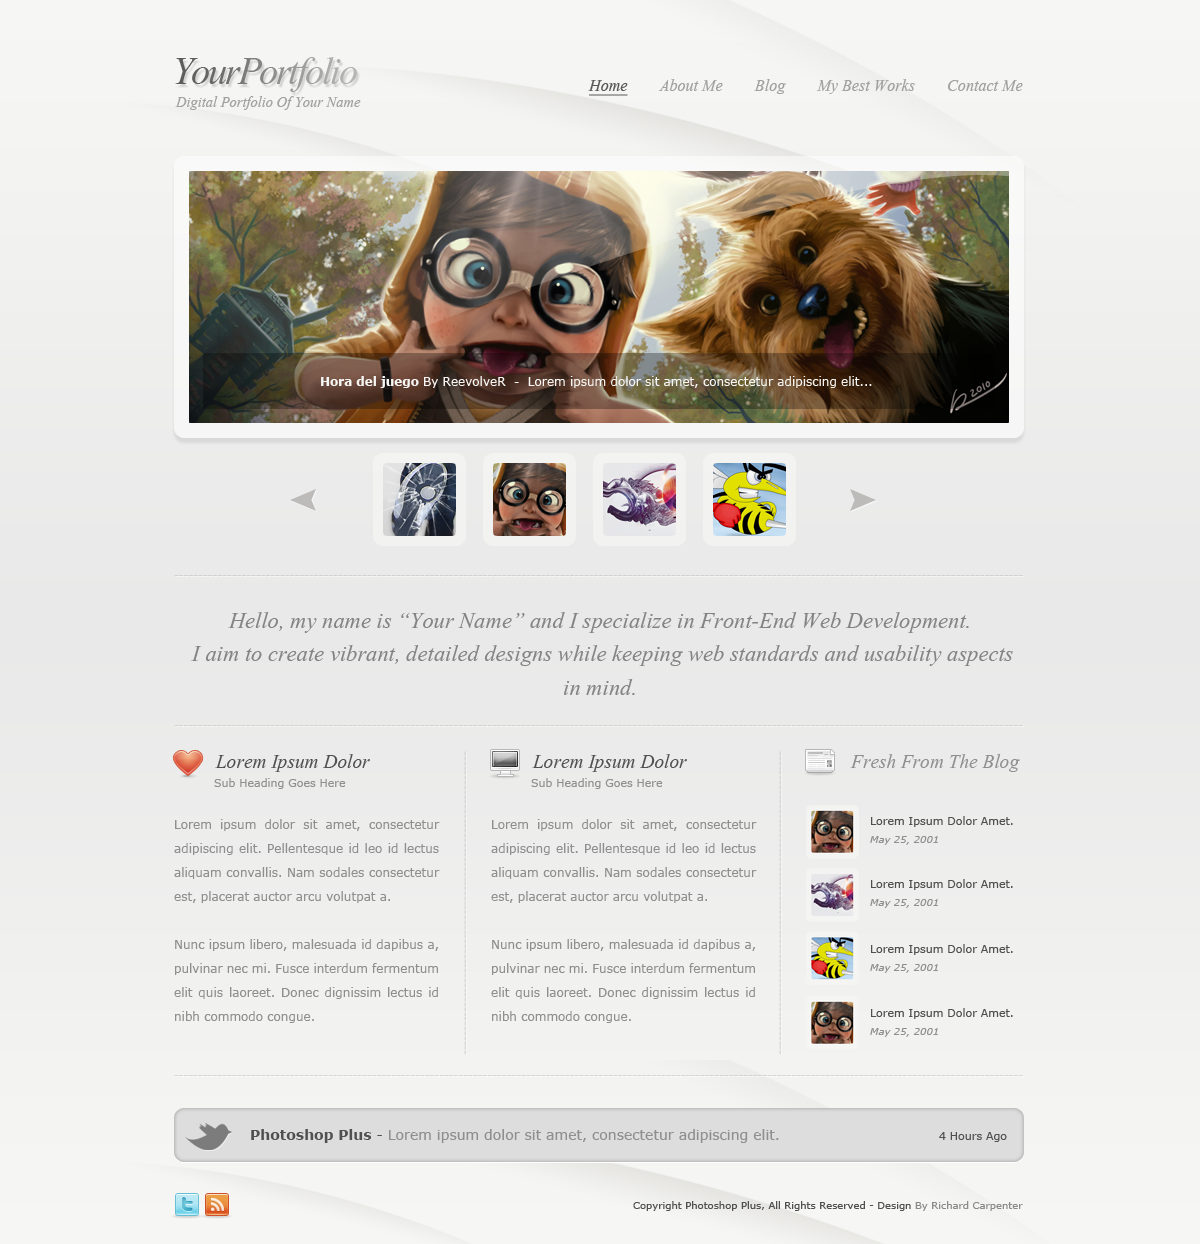
Creating Our Layout Background
Create a new document (Ctrl + N) with the dimensions 1200 x 1245 with a white #ffffff background. Right-click the background layer and select “Layer From Background” from the the menu, give the background layer a name then add a “Gradient Overlay” using the settings below.

Select the “Elliptical Marquee Tool” (M) then drag out a big ellipse onto the top of the canvas.

Create a new layer above the background layer then label it “Background Jazz”. Now select the “Gradient Tool” with the following options.

Drag the gradient over part of the top of the ellipse, we don’t want to fill the whole ellipse.

Deselect the ellipse (Ctrl + D) and you should have something like this.

Duplicate, rotate and adjust the opacity of each layer randomly placing them in the top half of the canvas. I’ve simply done this 3 times.

On the left side of the canvas add the portfolio title and slogan using the “Type Tool” (T). The font is used is called “Vijaya” and can be downloaded from the resource list.
Vijaya Font

Select the main title layer then add the following layer styles.


You should have something like this.

On the right side of the title and slogan add a simple textual navigation using the same font. For the hover effect on one of the links simply turn the text black and add a underscore.


Select the “Rounded Rectangle Tool” (U) with a radius of 10px then drag out a decent sized rectangle underneath the header elements.


Now select the “Rounded Rectangle Layer” and label “Featured” then add the following layer styles.


Now set the layers opacity to 50%, you should have something like this.

We now need to add our featured image inside of the rectangle, the image should be around with 15px smaller all the way around the rectangle. To do this first load a selection around the featured rectangle.
Quick Tip:
To load a selection click the little thumbnail in the layers window on the desired layer whilst holding down the CTRL key on the keyboard.

Once the selection has been loaded go to “Select > Modify > Contract”. Contract the selection by 15px then press OK. With the selection still loaded download and open the featured image.
Hora Del Juego By Reevolver
Copy the featured image to the clipboard then head back to your original canvas and go to “Edit > Paste Special > Paste into” (Alt + Shift + Ctrl + V”. Maneuver and resize the image so it looks how you want it to. Finally deselect the selection with “Ctrl + D”.

Select the “Pen Tool” (P) or the “Polygonal Lasso Tool” (L) and make a selection over the featured image like the image below.

Fill (G) the selection on a new layer with the color white #ffffff, then set the layer opacity to around 35%.

Next, we need to add the featured image caption. Simply select the “Rectangular Marquee Tool” (M) then drag out a rectangular selection across the bottom of the image.

Fill (G) the selection with any color then add the following layer styles.


Select the “Type Tool” (T) then add some caption text inside the rectangle, you should have something like this.

Select the “Rounded Rectangle Tool” (U) then drag out a small square underneath the featured area.

Change the squares color to white #ffffff then contract the square by 5-10px just like we did to our featured image. Once contracted paste inside one of your portfolio images.

Repeat this step 3 more times so you have a total of 4 images.

On the left and right sides of the thumbnail images add two arrows from the custom shapes library.

Add the following layer styles to the two arrows.


You should now have something like this.

Creating The Content
Start off by adding a simple divider underneath the featured area.

The divider was created simply with the “Type Tool” (T) using the “Dash Key (——)”. Once you’ve created the divider add the following layer styles.


Finally set the dividers opacity to 50% and your done. Now, using the “Type Tool” (T) add the portfolio tag line, the font i used is “Vijaya” which you can download from the resource list.
Vijaya Font
Finish off the tag line by duplicating the divider you created earlier then dragging it underneath the tag line.

Download the “Woofunction Icon Set” from the resource list then add two icons into the content area. On the side of each icon add a main heading and and sub heading.
Woofunction Icon Set

Underneath each heading and sub heading at a decent sized paragraph, separate each section with the divider we created earlier only this make it vertically.

In the space left on the right side of the content area add a little blog feed.

Finally duplicate the long horizontal divider and drag it underneath the content we just created.
Creating The Twitter Box
Select the “Rounded Rectangle Tool” (U) then drag out a rectangle underneath the last divider you just created.

Now add the following layer styles to the twitter rectangle.


You should have something like this.

Inside the rectangle add a little twitter bird of your choice then add the twitter text in which you normally see on a tweet.

Creating The Footer
Duplicate the 3 “Background Jazz Layers” then drag them to the bottom into the footer area.

Finally inside the footer add your copyright text and maybe some social icons from the “Woofunction Icon Set”.
Woofunction Icon Set

Conclusion
Thanks for taking part in this tutorial, if you managed to finish this tutorial I’d love to see some of your results. Feel free to post them up on our Facebook Fan Page.
 Posted in: Web Designing
0 comments:
Post a Comment